

CloudFront
Introduction
Section titled “Introduction”CloudFront is a content delivery network (CDN) service provided by Amazon Web Services (AWS). CloudFront distributes its web content, videos, applications, and APIs with low latency and high data transfer speeds. CloudFront APIs allow you to configure distributions, customize cache behavior, secure content with access controls, and monitor the CDN’s performance through real-time metrics.
LocalStack allows you to use the CloudFront APIs in your local environment to create local CloudFront distributions to transparently access your applications and file artifacts. LocalStack also runs CloudFront Functions at request time and emulates CloudFront KeyValueStore, so you can develop edge logic such as a tenant pre-router locally instead of validating it against live AWS. The supported APIs are available on our API Coverage section, which provides information on the extent of CloudFront’s integration with LocalStack.
Getting started
Section titled “Getting started”This guide is intended for users who wish to get more acquainted with CloudFront over LocalStack.
It assumes you have basic knowledge of the AWS CLI (and our lstk aws command).
Start your LocalStack container using your preferred method.
We will demonstrate how you can create an S3 bucket, put a text file named hello.txt to the bucket, and then create a CloudFront distribution which makes the file accessible via a https://abc123.cloudfront.net/hello.txt proxy URL (where abc123 is a placeholder for the real distribution ID).
To get started, create an S3 bucket using the mb command:
lstk aws s3 mb s3://abc123You can now go ahead, create a new text file named hello.txt and upload it to the bucket:
echo 'Hello World' > /tmp/hello.txtlstk aws s3 cp /tmp/hello.txt s3://abc123/hello.txt --acl public-readAfter uploading the file to S3, you can create a CloudFront distribution using the CreateDistribution API call.
Run the following command to create a distribution with the default settings:
domain=$(lstk aws cloudfront create-distribution \ --origin-domain-name abc123.s3.amazonaws.com | jq -r '.Distribution.DomainName')curl -k https://$domain/hello.txtIn the example provided above, be aware that the final command (curl https://$domain/hello.txt) might encounter a temporary failure accompanied by a warning message Could not resolve host.
This can occur because different operating systems adopt diverse DNS caching strategies, causing a delay in the availability of the CloudFront distribution’s DNS name (e.g., abc123.cloudfront.net) within the system.
Typically, after a few retries, the command should succeed.
It’s worth noting that similar behavior can be observed in the actual AWS environment, where CloudFront DNS names may take up to 10-15 minutes to propagate across the network.
CloudFront Functions
Section titled “CloudFront Functions”CloudFront Functions are lightweight JavaScript functions that run at the edge to inspect and rewrite requests.
LocalStack executes viewer-request functions at request time, so you can create a function, validate it with TestFunction, publish it, attach it to a distribution, and observe its effect on a live request.
Create a function
Section titled “Create a function”Write the function code to a file.
The handler must be a top-level function named handler:
import cf from 'cloudfront';
function handler(event) {    var request = event.request;    request.headers['x-erp-env'] = { value: 'prod' };    return request;}
Create the function with CreateFunction:
awslocal cloudfront create-function \ --name stamp-env \ --function-code fileb://stamp-env.js \ --function-config 'Comment=stamp the environment,Runtime=cloudfront-js-2.0'{ "Location": "TODO", "ETag": "54ddd071", "FunctionSummary": { "Name": "stamp-env", "Status": "UNPUBLISHED", "FunctionConfig": { "Comment": "stamp the environment", "Runtime": "cloudfront-js-2.0" }, "FunctionMetadata": { "FunctionARN": "arn:aws:cloudfront::000000000000:function/stamp-env", "Stage": "DEVELOPMENT", "CreatedTime": "2026-08-20T15:28:49.477222+00:00", "LastModifiedTime": "2026-08-20T15:28:49.477226+00:00" } }}Test a function
Section titled “Test a function”TestFunction runs the function against a sample event and returns the computed output.
This is how you validate the logic without sending a request through a distribution.
Write the event object to a file:
{ "version": "1.0", "context": { "eventType": "viewer-request" }, "viewer": { "ip": "1.2.3.4" }, "request": { "method": "GET", "uri": "/index.html", "querystring": {}, "headers": { "host": { "value": "tenant-b.example.com" } }, "cookies": {} }}Pass the ETag returned by create-function as --if-match:
awslocal cloudfront test-function \ --name stamp-env \ --if-match 54ddd071 \ --event-object fileb://event.json \ --query 'TestResult.{Output:FunctionOutput,Logs:FunctionExecutionLogs,Error:FunctionErrorMessage}'{ "Output": "{\"request\": {\"method\": \"GET\", \"uri\": \"/index.html\", \"querystring\": {}, \"headers\": {\"host\": {\"value\": \"tenant-b.example.com\"}, \"x-erp-env\": {\"value\": \"prod\"}}, \"cookies\": {}}}", "Logs": [], "Error": ""}FunctionOutput is wrapped in request when the function returns a request, and in response when it returns a response object.
Anything the function writes with console.log, console.error or the other console methods is collected in FunctionExecutionLogs:
[ "routing tenant-b.example.com", "uri /index.html"]A function that raises at runtime does not fail the API call.
TestFunction returns 200 with the error in FunctionErrorMessage and FunctionOutput set to {}.
Publish a function
Section titled “Publish a function”PublishFunction marks the function ready to associate with a distribution:
awslocal cloudfront publish-function --name stamp-env --if-match 54ddd071{ "FunctionSummary": { "Name": "stamp-env", "Status": "UNASSOCIATED", "FunctionConfig": { "Comment": "stamp the environment", "Runtime": "cloudfront-js-2.0" }, "FunctionMetadata": { "FunctionARN": "arn:aws:cloudfront::000000000000:function/stamp-env", "Stage": "DEVELOPMENT", "CreatedTime": "2026-08-20T15:28:49.477222+00:00", "LastModifiedTime": "2026-08-20T15:28:49.477226+00:00" } }}Attach the function to a distribution
Section titled “Attach the function to a distribution”Add the function ARN to FunctionAssociations on the DefaultCacheBehavior of your distribution config:
"DefaultCacheBehavior": { "TargetOriginId": "erp-origin", "ViewerProtocolPolicy": "allow-all", "ForwardedValues": { "QueryString": false, "Cookies": { "Forward": "none" } }, "MinTTL": 0, "FunctionAssociations": { "Quantity": 1, "Items": [ { "EventType": "viewer-request", "FunctionARN": "arn:aws:cloudfront::000000000000:function/stamp-env" } ] }}Every request through the distribution now runs the function before the origin is contacted. See Tenant routing at the edge for a complete, working configuration.
Returning a response directly
Section titled “Returning a response directly”A function can end the request without contacting the origin by returning an object with a statusCode.
LocalStack applies the status code, headers, cookies and body:
import cf from 'cloudfront';
function handler(event) {    return {        statusCode: 403,        headers: { 'x-blocked-tenant': { value: 'acme' } },        cookies: {            blocked: { value: '1', attributes: 'Path=/; Secure' },            trace: { value: 'abc' }        },        body: { encoding: 'text', data: 'tenant blocked' }    };}
body.encoding accepts text and base64.
Each entry in cookies becomes a Set-Cookie header, with attributes appended verbatim and multiValue entries emitted as additional headers of the same name.
If the function raises at request time, the distribution responds with 500 and the body The CloudFront function associated with the distribution failed to execute.
Current limitations
Section titled “Current limitations”- Only
viewer-requestassociations execute.viewer-responseassociations are stored but never run. - Only associations on the
DefaultCacheBehaviorexecute. Associations on other cache behaviors are stored but never run. - Only
uriandheadersfrom the returned request are applied. Changes toquerystring,cookiesandmethodare discarded. cf.kvs()is the only runtime helper.cf.crypto,cf.querystringandcf.updateRequestOrigin()are not available.statusDescriptionis not propagated when a function returns a response directly. The reason phrase is regenerated from the status code.- Publishing is not enforced at request time: an unpublished function attached to a distribution still runs.
PublishFunctionupdatesStatusbutStageremainsDEVELOPMENT. - One code blob is stored per function, so the
DEVELOPMENTandLIVEstages resolve to the same code and the--stageoption oftest-functionhas no effect. ComputeUtilizationis always"0".Locationin theCreateFunctionresponse is the placeholder stringTODOinstead of a URL.- Functions run on Node.js rather than the restricted CloudFront JavaScript runtime. Code that uses Node.js globals or
fetchworks locally and fails on AWS. Conversely, onlyimportstatements that referencecloudfrontare removed before execution, so any other import, such ascrypto, raises aSyntaxErrorlocally even though AWS supports it. - Function executions are serialized on a single Node.js process, which limits throughput under concurrent requests.
KeyValueStore Ultimate
Section titled “KeyValueStore ”A CloudFront KeyValueStore holds key-value data that a CloudFront Function reads at request time, which lets you change the data a function acts on without republishing it.
It is split across two APIs: the stores themselves are managed through the cloudfront control plane, and their contents are read and written through the separate cloudfront-keyvaluestore data plane.
Create a key value store
Section titled “Create a key value store”Create a store with CreateKeyValueStore:
awslocal cloudfront create-key-value-store \ --name tenant-map \ --comment "tenant to environment"{ "ETag": "02CDEC9C", "Location": "arn:aws:cloudfront::000000000000:key-value-store/d1fa734b-f440-4ebe-b477-8a12c8383488", "KeyValueStore": { "Name": "tenant-map", "Id": "d1fa734b-f440-4ebe-b477-8a12c8383488", "Comment": "tenant to environment", "ARN": "arn:aws:cloudfront::000000000000:key-value-store/d1fa734b-f440-4ebe-b477-8a12c8383488", "Status": "READY", "LastModifiedTime": "2026-08-20T15:28:15.621304+00:00" }}The remaining control-plane operations are DescribeKeyValueStore, ListKeyValueStores, UpdateKeyValueStore and DeleteKeyValueStore, all addressing the store by --name.
Read and write keys
Section titled “Read and write keys”Keys live behind the cloudfront-keyvaluestore service, which addresses a store by ARN rather than by name.
The remaining examples in this section assume you have exported the store ARN and the endpoint host:
export KVS_ARN=arn:aws:cloudfront::000000000000:key-value-store/d1fa734b-f440-4ebe-b477-8a12c8383488export LOCALSTACK_HOST=localhost.localstack.cloudWrites require the current ETag in --if-match.
Read it from the data plane with DescribeKeyValueStore:
awslocal cloudfront-keyvaluestore describe-key-value-store --kvs-arn "$KVS_ARN"{ "ETag": "02CDEC9C", "ItemCount": 0, "TotalSizeInBytes": 0, "KvsARN": "arn:aws:cloudfront::000000000000:key-value-store/d1fa734b-f440-4ebe-b477-8a12c8383488", "Created": "2026-08-20T17:28:15.621304+02:00", "LastModified": "2026-08-20T17:28:15.621304+02:00", "Status": "READY"}Write several keys at once with UpdateKeys, which also accepts --deletes:
awslocal cloudfront-keyvaluestore update-keys \ --kvs-arn "$KVS_ARN" \ --if-match 02CDEC9C \ --puts 'Key=tenant-a.example.com,Value=prod' 'Key=tenant-b.example.com,Value=prod-sand'{ "ETag": "6B15D4E0", "ItemCount": 2, "TotalSizeInBytes": 53}TotalSizeInBytes is the combined UTF-8 length of every key and value in the store.
List the contents with ListKeys:
awslocal cloudfront-keyvaluestore list-keys --kvs-arn "$KVS_ARN"{ "Items": [ { "Key": "tenant-a.example.com", "Value": "prod" }, { "Key": "tenant-b.example.com", "Value": "prod-sand" } ]}Single keys are handled with PutKey, GetKey and DeleteKey:
awslocal cloudfront-keyvaluestore get-key --kvs-arn "$KVS_ARN" --key tenant-a.example.com{ "Key": "tenant-a.example.com", "Value": "prod", "ItemCount": 2, "TotalSizeInBytes": 53}LocalStack implements the whole cloudfront-keyvaluestore API:
| Operation | Implemented |
|---|---|
DescribeKeyValueStore |
✅ |
GetKey |
✅ |
PutKey |
✅ |
DeleteKey |
✅ |
UpdateKeys |
✅ |
ListKeys |
✅ |
ETag handling
Section titled “ETag handling”Every write rotates the store’s ETag, so a write invalidates the ETag any earlier response gave you.
Read the current ETag from the same plane you are about to call: cloudfront describe-key-value-store --name for a control-plane update or delete, and cloudfront-keyvaluestore describe-key-value-store --kvs-arn for a data-plane write.
Concurrency and lookup failures surface as follows:
| Situation | Error code | Message |
|---|---|---|
Stale or empty --if-match on a data-plane write |
ValidationException |
Pre-Condition failed during update of Key-Value-Store |
Stale or empty --if-match on a control-plane update or delete |
InvalidIfMatchVersion |
The If-Match version is missing or not valid for the resource. |
| Store name not found | EntityNotFound |
The specified KeyValueStore does not exist. |
| Store ARN not found | ResourceNotFoundException |
The Key Value Store was not found. |
Key not found in get-key |
ResourceNotFoundException |
The Key was not found. |
| Store name already taken | EntityAlreadyExists |
The Key Value Store already exists. |
| Deleting a store a function is associated with | CannotDeleteEntityWhileInUse |
Cannot delete KeyValueStore tenant-map because it is associated with a function |
Reading a store from a function
Section titled “Reading a store from a function”Associate the store when you create the function, through KeyValueStoreAssociations:
awslocal cloudfront create-function \ --name tenant-router \ --function-code fileb://tenant-router.js \ --function-config "Comment=tenant pre-router,Runtime=cloudfront-js-2.0,KeyValueStoreAssociations={Quantity=1,Items=[{KeyValueStoreARN=$KVS_ARN}]}"The function reads the associated store through cf.kvs():
| Call | Returns |
|---|---|
await cf.kvs().get(key) |
the value as a string |
await cf.kvs().get(key, { format: 'json' }) |
the value parsed as JSON |
await cf.kvs().exists(key) |
true or false |
await cf.kvs().meta() |
{ keyCount: <number> } |
get raises KeyValueStore key not found: <key> for a key that is absent, and an unhandled error becomes a 500 response, so guard lookups that can miss with exists.
Calling cf.kvs() in a function with no associated store raises Function is not associated with a KeyValueStore.
Managing a key value store with Terraform
Section titled “Managing a key value store with Terraform”The hashicorp/aws provider manages stores with aws_cloudfront_key_value_store and their contents with aws_cloudfrontkeyvaluestore_keys_exclusive, both of which work against LocalStack from version 5.100 onwards.
provider "aws" { region = "us-east-1" access_key = "test" secret_key = "test" skip_credentials_validation = true skip_metadata_api_check = true skip_requesting_account_id = true
endpoints { cloudfront = "http://localhost:4566" cloudfrontkeyvaluestore = "http://localhost.localstack.cloud:4566" }}
resource "aws_cloudfront_key_value_store" "tenant_map" { name = "tenant-map" comment = "tenant to environment"}
resource "aws_cloudfrontkeyvaluestore_keys_exclusive" "tenant_map" { key_value_store_arn = aws_cloudfront_key_value_store.tenant_map.arn max_batch_size = 50
resource_key_value_pair { key = "tenant-a.example.com" value = "prod" } resource_key_value_pair { key = "tenant-b.example.com" value = "prod-sand" }}aws_cloudfront_key_value_store.tenant_map: Creation complete after 0s [id=15a50515-9931-4d2e-87bd-df5b3bf312e6]aws_cloudfrontkeyvaluestore_keys_exclusive.tenant_map: Creation complete after 0s
Apply complete! Resources: 2 added, 0 changed, 0 destroyed.Current limitations
Section titled “Current limitations”ImportSourceandTagsoncreate-key-value-storeare accepted and ignored. A store is not seeded from S3 and cannot be tagged.Statusis alwaysREADY. There is noPROVISIONINGstate and no propagation delay, so a write is visible to the next request immediately rather than eventually.Locationin thecreate-key-value-storeresponse is the store ARN instead of a URL.- Pagination is not implemented.
list-keysignores--max-resultsand--next-token, andlist-key-value-storesignores--marker,--max-itemsand the status filter. - AWS quotas, such as the 5 MB store and 1 KB key limits, are not enforced.
- Only the first entry of
KeyValueStoreAssociationsis used. - The store contents are copied into the function at the start of an execution, so a write made during an execution is not visible to it.
- The data plane resolves a store purely by ARN and does not check the caller’s account, so any credentials can read and write any store.
- Keys are persisted as part of the
cloudfrontservice state rather than thecloudfront-keyvaluestoreservice. A Cloud Pod or state export limited tocloudfront-keyvaluestoretherefore contains no keys, and resettingcloudfrontdiscards them. - There is no CloudFormation resource provider for
AWS::CloudFront::KeyValueStore.
Tenant routing at the edge
Section titled “Tenant routing at the edge”A common use of Functions with a KeyValueStore is a tenant pre-router. The function maps the incoming tenant to an environment and passes the decision to the origin, so routing data can change without redeploying the function.
This example maps a tenant hostname to an environment name and stamps it on the request as x-erp-env, which is the form that behaves the same on AWS.
Create the store and seed it as shown in KeyValueStore, then write the function:
import cf from 'cloudfront';
async function handler(event) {    var request = event.request;    var tenant = request.headers.host.value;    var kvs = cf.kvs();    var env = (await kvs.exists(tenant)) ? await kvs.get(tenant) : 'prod';    request.headers['x-erp-env'] = { value: env };    return request;}
Create the function with the store associated, then publish it:
export FUNCTION_ETAG=$(awslocal cloudfront create-function \ --name tenant-router \ --function-code fileb://tenant-router.js \ --function-config "Comment=tenant pre-router,Runtime=cloudfront-js-2.0,KeyValueStoreAssociations={Quantity=1,Items=[{KeyValueStoreARN=$KVS_ARN}]}" \ --query ETag --output text)awslocal cloudfront publish-function --name tenant-router --if-match "$FUNCTION_ETAG"Confirm the routing decision with test-function before wiring up a distribution.
With host set to tenant-b.example.com in event.json, the function resolves the tenant through the store:
awslocal cloudfront test-function \ --name tenant-router \ --if-match "$FUNCTION_ETAG" \ --event-object fileb://event.json \ --query 'TestResult.FunctionOutput'"{\"request\": {\"method\": \"GET\", \"uri\": \"/index.html\", \"querystring\": {}, \"headers\": {\"host\": {\"value\": \"tenant-b.example.com\"}, \"x-erp-env\": {\"value\": \"prod-sand\"}}, \"cookies\": {}}}"To exercise the same path over a real request, create a distribution that lists the tenant hostnames in Aliases and attaches the function to its DefaultCacheBehavior.
DomainName is the address of your origin as seen from the LocalStack container:
{ "CallerReference": "tenant-router-demo", "Comment": "", "Enabled": true, "Aliases": { "Quantity": 2, "Items": ["tenant-a.example.com", "tenant-b.example.com"] }, "Origins": { "Quantity": 1, "Items": [ { "Id": "erp-origin", "DomainName": "<origin-ip>", "CustomOriginConfig": { "HTTPPort": 80, "HTTPSPort": 443, "OriginProtocolPolicy": "http-only" } } ] }, "DefaultCacheBehavior": { "TargetOriginId": "erp-origin", "ViewerProtocolPolicy": "allow-all", "ForwardedValues": { "QueryString": false, "Cookies": { "Forward": "none" } }, "MinTTL": 0, "FunctionAssociations": { "Quantity": 1, "Items": [ { "EventType": "viewer-request", "FunctionARN": "arn:aws:cloudfront::000000000000:function/tenant-router" } ] } }}awslocal cloudfront create-distribution \ --distribution-config file://distribution-config.json \ --query '{Id:Distribution.Id,DomainName:Distribution.DomainName}'{ "Id": "56a90d1e", "DomainName": "56a90d1e.cloudfront.localhost.localstack.cloud"}Because the tenant hostnames are registered as aliases, you can address the distribution with the tenant’s Host header and the function receives the same hostname it would see on AWS:
curl -s -H "Host: tenant-a.example.com" http://localhost.localstack.cloud:4566/index.htmlcurl -s -H "Host: tenant-b.example.com" http://localhost.localstack.cloud:4566/index.htmlWith an origin that echoes the request headers, the two requests reach it carrying different environments:
"x-erp-env": "prod""x-erp-env": "prod-sand"A hostname that is not listed in Aliases does not match the distribution and returns 404.
A hostname that is listed but has no key in the store falls through to the prod default in the function.
Routing by URI rewrite
Section titled “Routing by URI rewrite”A function can also select the origin itself, by rewriting request.uri to a prefix that a cache behavior matches:
import cf from 'cloudfront';
async function handler(event) {    var request = event.request;    var env = await cf.kvs().get(request.headers.tenant.value);    request.uri = '/' + env + request.uri;    return request;}
With CacheBehaviors entries for the path patterns /prod/* and /nonprod/*, each pointing at a different origin, the rewritten path selects the origin.
Lambda@Edge
Section titled “Lambda@Edge”You can enable this feature by setting CLOUDFRONT_LAMBDA_EDGE=1 in your LocalStack configuration.
Current features
Section titled “Current features”- Support for
CreateDistributionAPI to set up CloudFront distributions with Lambda@Edge. - Support for modifying request and response headers dynamically.
- Support for
IncludeBodyparameter. - Support for Node.js & Python 3.x runtime.
Current limitations
Section titled “Current limitations”- The
UpdateDistribution,DeleteDistribution, and Persistence Restore features are not yet supported for Lambda@Edge. - The
origin-requestandorigin-responseevent types currently trigger for each request because caching is not implemented in CloudFront.
Using custom URLs
Section titled “Using custom URLs”LocalStack for AWS supports using an alternate domain name, also referred to as a CNAME or custom domain name, to access your applications and file artifacts instead of relying on the domain name generated by CloudFront for your distribution.
To set up the custom domain name, you must configure it in your local DNS server.
Once that is done, you can designate the desired domain name as an alias for the target distribution.
To achieve this, you’ll need to provide the Aliases field in the --distribution-config option when creating or updating a distribution.
The format of this structure is similar to the one used in AWS CloudFront options.
In the given example, two domains are specified as Aliases for a distribution.
Please note that a complete configuration would entail additional values relevant to the distribution, which have been omitted here for brevity.
--distribution-config {...'Aliases':'{'Quantity':2, 'Items': ['custom.domain.one', 'customDomain.two']}'...}Custom IDs for CloudFront Distributions via tags
Section titled “Custom IDs for CloudFront Distributions via tags”Each CloudFront distribution is created with a random unique identifier automatically assigned by AWS. Given that the distribution ID is part of the generated domain name, it can be useful to have the possibility to create distributions with a deterministic ID (e.g., to simplify testing or integration with other AWS services).
LocalStack offers this possibility by using the _custom_id_ tag when creating a distribution with the CreateDistributionWithTags operation.
Resource Browser
Section titled “Resource Browser”The LocalStack Web Application provides a Resource Browser for CloudFront, which allows you to view and manage your CloudFront distributions. You can access the Resource Browser by opening the LocalStack Web Application in your browser, navigating to the Resource Browser section, and then clicking on CloudFront under the Analytics section.
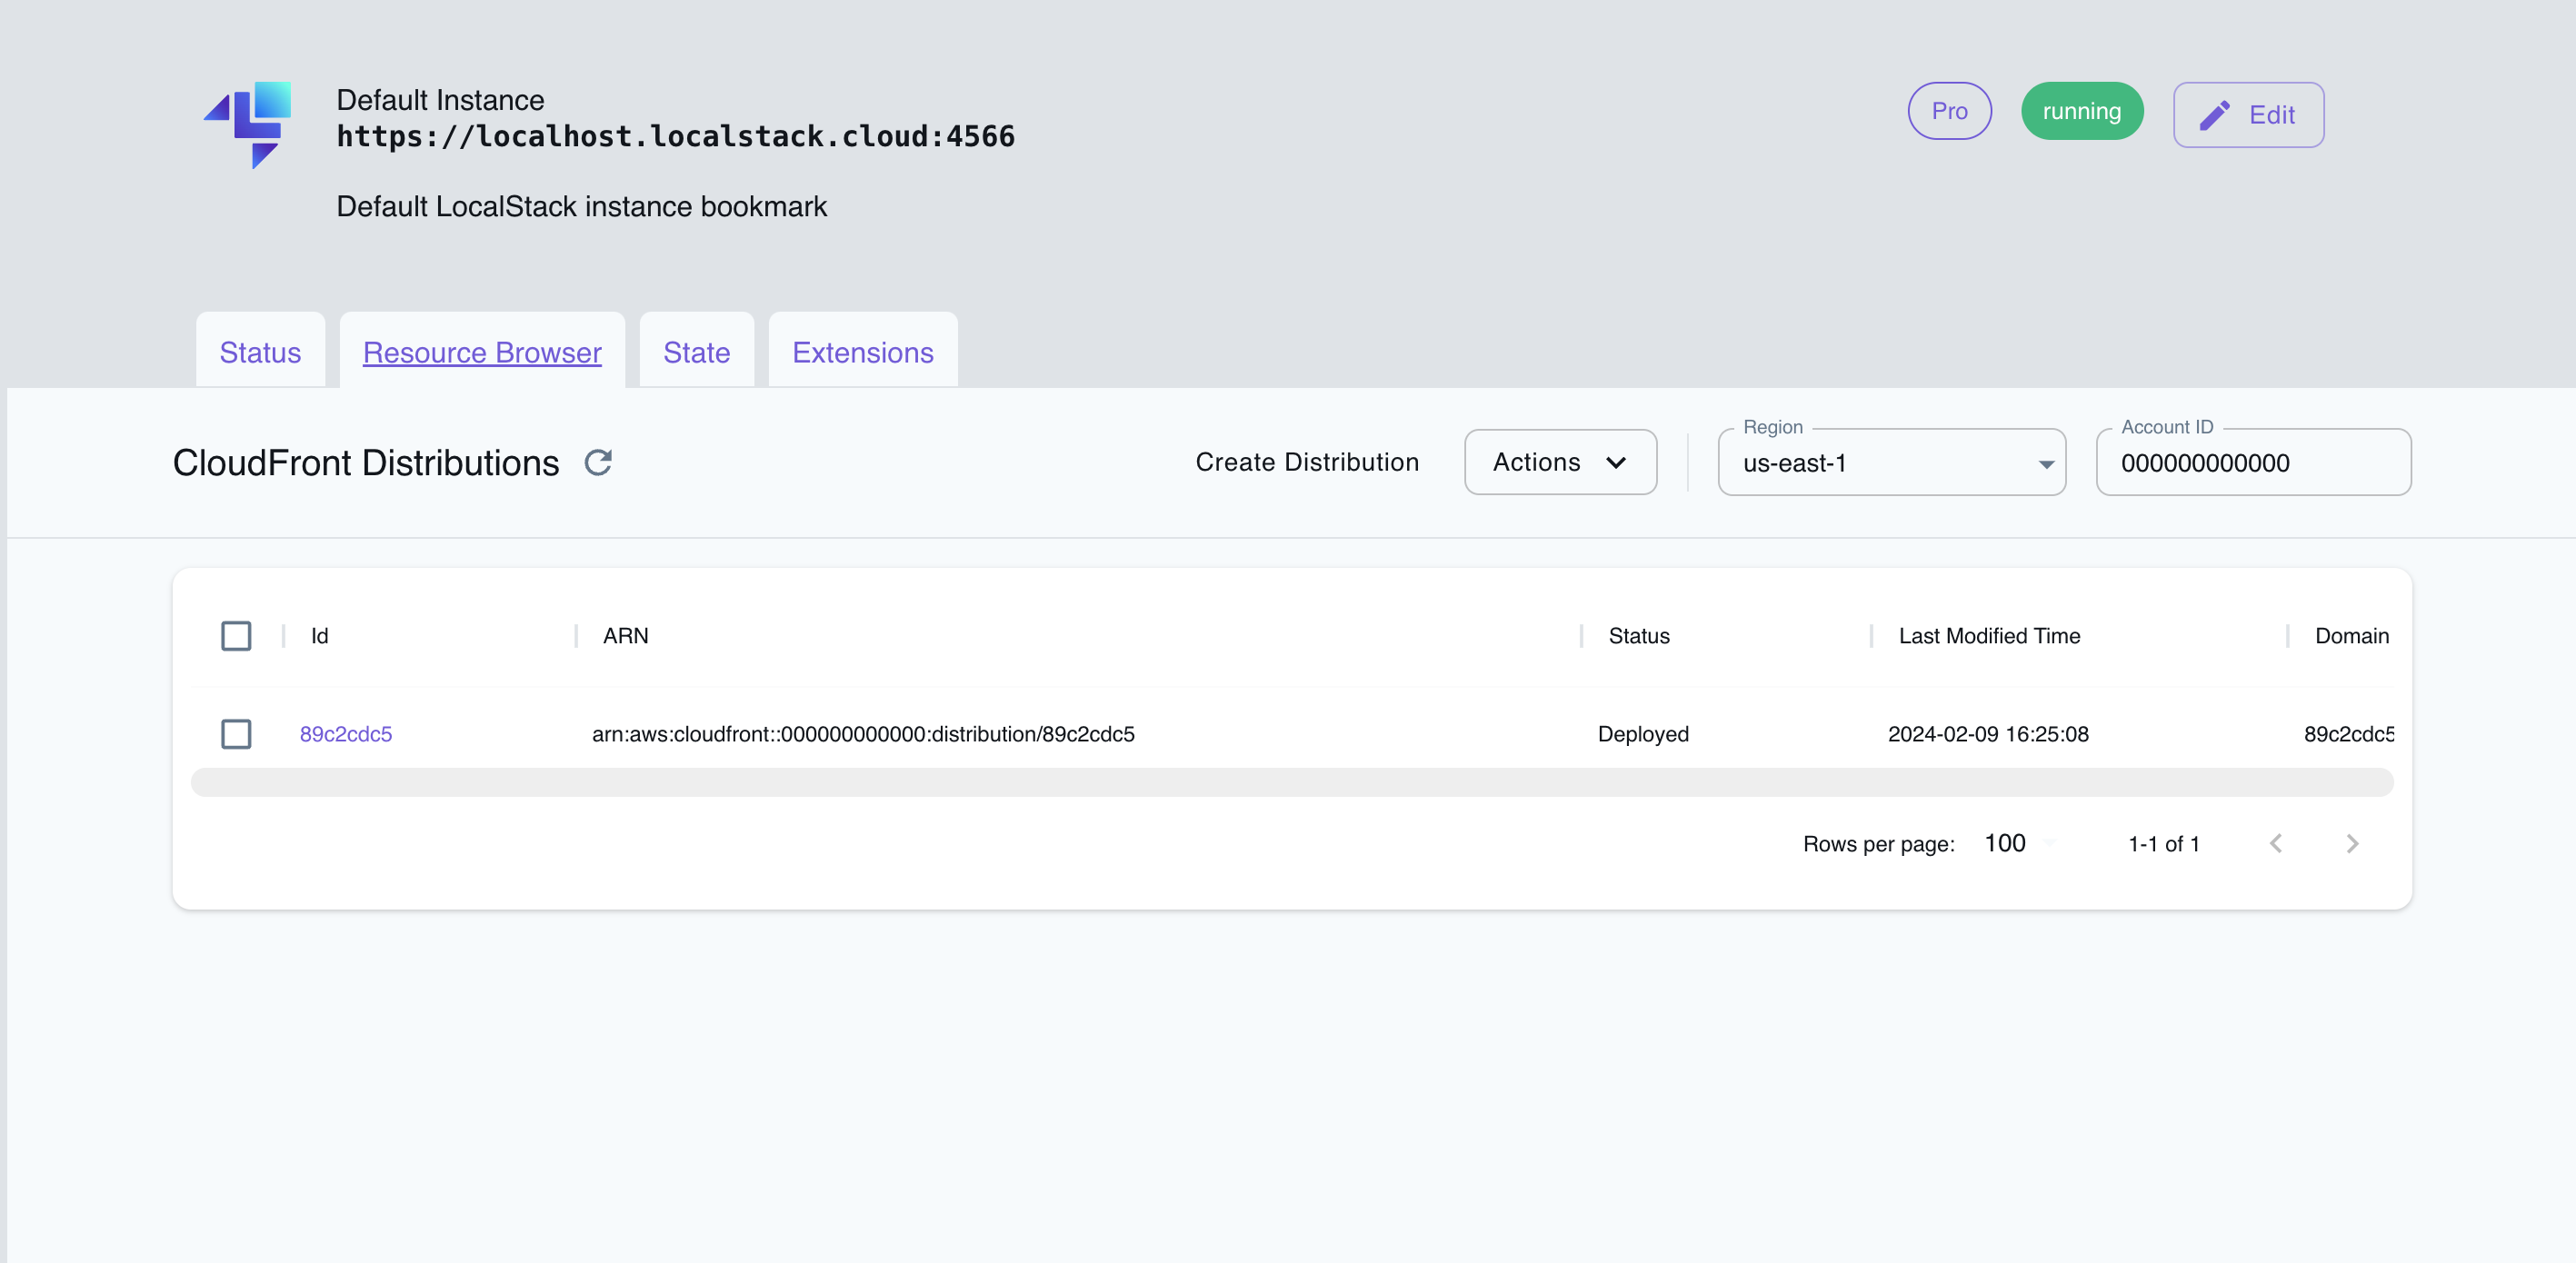
The Resource Browser allows you to perform the following actions:
- Create Distribution: Create a new CloudFront distribution by specifying the Origins and other settings.
- List Distributions: View a list of all CloudFront distributions.
- Edit Distribution: Modify the settings of an existing CloudFront distribution by opening the distribution’s details page and clicking on the Edit Distribution button.
- Delete Distribution: Delete an existing CloudFront distribution by selecting the distribution, click on Actions, and then click on Remove Selected.
Examples
Section titled “Examples”The following code snippets and sample applications provide practical examples of how to use CloudFront in LocalStack for various use cases:
API Coverage
Section titled “API Coverage”| Operation ▲ | Implemented ▼ | Verified on Kubernetes |
|---|